 English
 русский
 عربى
عربى


add: North of Gaoxin North Road, east of Jinyun Road, Wannian High-tech Zone, Shangrao City, Jiangxi Province
You have just wrapped a gift, and the trimmed-off edge of wrapping paper is about to go into the bin. Or you have finished a morning of bouquet orders in a flower shop, and the workbench is covered with offcuts of 57 by 57 centimeter wrapping paper. Before those pieces disappear into the trash, consider what a single sheet can become. A flower.
The direct answer to "how to make a flower out of wrapping paper" is honest: cut a piece, fold or shape it, and fix the parts together with glue, tape, or wire. The useful answer is an approach. The same sheet that wraps a present can produce a crisp rosette, a soft layered bloom, an architectural folded blossom, a fluffy pom-pom, or a rose with convincing curling petals. The right technique depends on the paper in front of you and the look you are aiming for. This guide walks through five reliable methods, the tools that make them easier, the paper types that fold well and the ones that do not, and the small practical details that turn a first attempt into a polished piece.
Although these projects are simple enough for an afternoon at a kitchen table, the principles behind them come from professional flower packaging. In a flower shop, wrapping paper is a daily working material: sheets of 57 by 57 centimeters, 58 by 58 centimeters, and similar sizes are cut, folded, crimped, and shaped around bouquets at speed. The same material discipline applies to paper flowers. Once you know how a particular sheet bends, holds a crease, and responds to glue, you can reproduce the same flower again and again with consistent results, which matters whether you are wrapping one present or preparing fifty bouquets.
Why Make Flowers from Wrapping Paper?
Most people turn to paper flowers for one of three reasons: they want a gift topper that matches the wrapping exactly, they want to use leftover paper rather than throw it out, or they want to add a decorative accent without buying extra plastic or metal trims. All three reasons are practical, and all three are satisfied by the same set of techniques.
- Exact color matching. The flower can be made from the same sheet as the wrap. The finished parcel keeps one unified palette, which is harder to achieve with store-bought toppers.
- Zero waste in practice. The offcuts from a wrapped gift or a finished bouquet are transformed into an embellishment, not thrown away.
- Low cost at scale. A shop can produce flowers in-house from wrapping paper it already buys, instead of stocking pre-made decorations in several colors.
- Light and compact. Paper flowers add height and texture without weighing down a parcel or a bouquet.
- Long shelf life. Unwrapped paper flowers do not wilt, and they can be flattened, boxed, and stored until needed.
For florists and owners of flower shops, paper flowers solve an additional packaging problem. A standard hand-tied bouquet often benefits from a small accent at the front, near the tie point, to hide the transition between stems and wrap. A flower made from the very same wrapping paper family can be slipped under the ribbon and secured in seconds. From the customer's perspective, the result looks deliberately styled. From the shop's perspective, the cost is a few minutes of the florist's time and a piece of paper that would otherwise have been scrap.
For home crafters, the advantage is control. You do not need to source special craft paper from a hobby store. Any clean sheet of wrapping paper will do, and the flower can be sized to fit the gift instead of the other way around. A 4-centimeter rose can be pinned to a gift card; a 30-centimeter pom-pom can fill the top of a large shopping bag; the scale changes, but the techniques stay the same.
Choosing the Right Wrapping Paper for the Flower
Before cutting, it helps to understand how the paper will behave. The term "wrapping paper" covers a wide range of materials, from soft cotton-like tissue to dense kraft paper, from smooth matte films to glossy plastic films. Each material has distinct characteristics that determine which flower-making method will succeed.
The properties that matter most are stiffness, surface texture, absorbency, and the ability to hold a crease. Soft paper, such as tissue or cotton wrapping paper, will not hold sharp folds, but it gathers and fluffs beautifully. Dense paper, such as kraft, holds a fold crisply but resists being curled around a pencil. Smooth coated films, such as OPP plastic, will not hold a crease at all; glue also struggles to bond to them without the heat of a low-temperature glue gun. Choose the paper according to the technique, or choose the technique according to the paper, which is the first decision that separates a neat flower from a wobbly one.
| Paper type | How it behaves | Best flower styles | Care notes |
|---|---|---|---|
| Tissue-like cotton paper | Soft, absorbent, easy to crinkle, gentle sheen | Fringed pom-poms, layered petals, ruffled accents | Do not wet; fluff by hand |
| Kraft paper | Dense, crisp, holds creases well | Spiral roses, folded blossoms, structured petals | Creases stay visible; embrace them as part of the finish |
| Matte paper | Smooth, uniform, holds folds without glare | Layered petal flowers, gift-topper roses | Accepts glue and pencil marks equally well |
| Pearlescent film | Slightly stiff, reflective, smooth | Accent petals, flowers for evening events | Combine with kraft or matte to add sheen |
| Plastic (OPP) film | Slippery, waterproof, does not hold folds | Outer gloss layer, not the petal itself | Use glue or wire; avoid tight folding |
| Cellophane | Crisp, transparent, lightweight | Small accent leaves, shimmering details | Can crack when sharply creased |
For a first flower, the most forgiving choices are matte paper and kraft paper. They fold cleanly, hold the bent edge, and hide the small handling marks that glue often leaves. If you reach for a softer cotton or tissue paper, choose the fringed pom-pom method instead of techniques that demand sharp creases. A translucent solid color wrapping paper of this kind is a practical choice for layered flowers, because it keeps a single, even tone while letting light move through the petals.
 Wholesale Matte solid color translucent flower wrapping paper Factory, SuppliersJiangxi Lixuan new material Technology Co., Ltd is China wholesale Matte solid color translucent flower wrapping paper suppliers and fact...View Product →
If you want to compare constructions before buying, our flower wrapping paper and film collections cover the main paper families side by side.
Sheet size also simplifies planning. Most commercial wrapping paper arrives in sheets around 57 by 57 centimeters or 58 by 58 centimeters, or in rolls for high-volume shops. A 57 by 57 centimeter sheet quarters neatly into four squares for medium blossoms, and it cuts efficiently into 6 to 10 centimeter strips for the accordion and spiral methods. All of the projects in this guide are based on those standard sizes, so the measurements are easy to reproduce with whatever paper you already use.
Tools and Preparation
Paper does most of the work, but a short list of tools makes the flowers faster, cleaner, and easier to repeat.
- Scissors and a craft knife. Sharp blades matter; a dull pair will tear thin paper.
- A cutting mat and a ruler with a metal edge, if you plan to cut strips.
- Pencil and cardboard for templates.
- A bone folder, or a blunt butter knife, for pressing creases.
- Glue. A glue stick for flat surfaces, and a low-temperature hot glue gun for layered petals.
- Double-sided tape, floral wire, and wire cutters.
- Buttons, beads, paper discs, or twine for the center of the flower.
Prepare the paper before you cut
Remove creases from previously folded wrapping paper by pressing it under a heavy book overnight, or by ironing it on a low setting between two dry cloths. Keep the printed or colored side consistent. For wrapped bouquets, shops usually work with the printed side facing outward; for paper flowers, the same convention holds, but you may prefer the reverse side if the coating on the printed side is slippery.
Plan the scale
A single 57 by 57 centimeter sheet can be translated into flower numbers with some simple planning: about four 10-centimeter layered flowers, two large spiral roses, two 12 to 15 centimeter accordion rosettes, or one large fringed pom-pom. One sheet is enough for a table of several small toppers. For shops, planning the number of flowers per pack of paper is a practical forecasting exercise: one ream of standard wrapping sheets can yield hundreds of small paper flower accents.
Make templates once, use them many times
Cardboard templates turn a homemade flower into a repeatable product. Cut a set of petal shapes, a spiral template, and a center disc; label them by size. Whenever you need a flower, trace the template on the back of the wrapping paper, cut, and assemble. This routine is what makes paper flowers viable for a flower shop or a workshop: the design work happens once, and the production becomes a simple procedure.
Method 1: The Accordion Rosette
The accordion rosette is the fastest method in this guide, and the best place to start. It produces a circular bloom with radiating petals, similar to a crafted chrysanthemum. It adapts to nearly every wrapping paper type in the matte and cotton categories.
Step-by-step instructions
- Cut a strip of wrapping paper 8 to 10 centimeters wide and the full length of the sheet. For a fuller flower, tape two strips together end to end on the back of the paper.
- Accordion-fold the strip into 1.5 to 2 centimeter segments. Keep the folded edges aligned; the tighter the fold, the finer the petals.
- Fold the long accordion strip in half at the exact center. Hold the bundle together with one hand.
- Shape the outer ends. Leave them square for a clean, contemporary look; cut a half-circle across the ends for rounded petals; cut a V-shape for pointed petals.
- Staple the center of the bundle, then wrap a piece of floral wire around the staple and twist the wire on the back. The wire also gives the flower a stem for attaching it to a gift.
- Open the folded fan one layer at a time. Gently pull the top layer toward you, then the next layer on the opposite side, alternating until all layers stand apart.
- Cover the stapled center with a button, a bead, or a small circle of wrapping paper.
The cut at the ends determines the whole character of the flower. A half-circle cut produces a soft, fully rounded bloom. A pointed V cut produces a star-like flower with visible separation between petals. A square cut leaves the petals broad and smooth, best for a minimalist look. Whatever cut you choose, make it before you start pulling the layers open.
This method takes about ten minutes per flower once you have the rhythm. It is also the easiest to batch-produce: cut and fold several strips, staple and shape them all at once, then attach the centers in a final pass.
Method 2: The Layered Petal Flower
For a more natural flower with visible individual petals, build it from separate layers. The technique resembles the construction of a classic fabric flower, adapted to wrapping paper. It gives you control over the number of petals, the size, and the amount of cupping at the center.
Step-by-step instructions
- Make three petal templates from cardboard: large, medium, and small. A usual petal is 5 to 8 centimeters long with a narrow base. The exact shape is less important than the consistent size of each set.
- Trace the large template four times on the back of the wrapping paper. Cut the petals out. Repeat for the medium and small templates, so you have twelve petals in total. Some versions use five petals per layer; four keeps the flower compact and easy to glue.
- Curl the petals. Wrap the upper half of a petal around a pencil, then pull the paper gently to the side. Curl the outer petals inward for a closed bud, or outward for an open bloom.
- Cut a base disc of the same wrapping paper, about 3 to 4 centimeters across. Apply glue to the disc.
- Attach the four large petals first, evenly spaced around the disc. Wait for the glue to set.
- Attach the medium petals in the spaces left between the large petals. Then attach the small petals in the same staggered pattern.
- Finish the center with a button, a paper disc, a small folded square, or a short piece of ribbon.
The layering rule is simple: stagger. Each new layer of petals should sit in the gaps of the previous layer. This way the flower reads as a spiral of petals rather than a stack of separate layers. If you want a flatter flower, press each petal down toward the base as you glue it. If you want a taller, more dimensional bloom, keep the petals cupped by pressing the base of each petal between your fingers before attaching it.
Layered petal flowers are ideal for gift boxes because their profile is relatively flat. They also work well for bouquets: a single layered flower attached near the base of the stems draws the eye upward into the arrangement without competing with the fresh blooms.
Method 3: The Folded Fan Blossom
The folded fan blossom uses a clean pleating technique to build each petal as a small fan. The result is an architectural flower with sharp, repeating lines, which is a contrast to the soft natural shapes of the previous methods.
Step-by-step instructions
- Cut a circle 8 to 10 centimeters across for each petal. A larger 15 to 20 centimeter circle produces a bolder flower.
- Fold the circle in half. Beginning at the folded edge, make accordion pleats 1 to 1.5 centimeters wide across the semicircle until the whole piece becomes one narrow fan. Press every fold with your fingernail or a bone folder.
- Pinch the straight lower edge of the fan together. The pinched point becomes the base of the petal, and the pleated upper edge becomes the petal face.
- Make six of these fan petals. Use paper from the same sheet so the color and texture are consistent.
- Cut a small disc of paper, 3 to 4 centimeters across. Apply glue to its center.
- Attach the petals one by one around the disc, spacing them evenly, with the pinched points glued to the disc and the fan faces pointing outward.
- After the glue dries, curl the tips of the pleats around a pencil for a softer, more rounded look.
This flower is especially tolerant of slight variations in fold width. It also makes a strong visual pair with kraft and matte paper because the flat surfaces of the pleats catch the light evenly. If you want a two-tone effect, alternate petals cut from two different sheets of wrapping paper, for example a solid color and a light pattern from the same brand.
The folded fan blossom is a good project for teaching and workshops. Every petal follows the same simple pleating trick, so a group of people can produce consistent flowers quickly once the first fan is understood.
Method 4: The Fringed Pom-Pom Flower
The fringed pom-pom is the fluffiest flower in this list, and the most effective at filling space. It looks like a carnation or a dahlia, depending on how deeply the fringe is cut. The method relies on soft paper, so reach for cotton-like wrapping paper or tissue rather than stiff kraft or plastic film.
Step-by-step instructions
- Stack four to six sheets of wrapping paper, each 20 to 25 centimeters square. For a giant pom-pom, use larger sheets, for example a full 57 by 57 centimeter sheet.
- Accordion-fold the entire stack in 2 centimeter pleats. Because several layers are folded together, press each pleat with a ruler to keep the creases sharp.
- Tie the center of the folded strip with floral wire or a thin string and twist firmly. Leave the wire ends long enough to attach the finished flower.
- Cut the two ends of the folded bundle into your chosen shape: round corners for soft petals, or a shallow V cut for pointed ones.
- Cut fringe slits into both folded ends along the entire length of the bundle, spacing them 0.5 to 1 centimeter apart, with a depth of 3 to 5 centimeters. The uncut band at the center holds everything together.
- Open the bundle like a book. Then separate the layers one by one, working outward from the center, first on one side and then on the other.
- Fluff the separated layers until the fringe is evenly distributed into a sphere-like shape.
The two numbers that matter are the pleat width and the fringe depth. Narrow pleats produce fine, dense texture; wider pleats produce chunkier petals. Deep fringe gives a wispy, airy flower; shallow fringe gives a tight, full one. If the paper tears as you separate the layers, you have cut the fringe too deep or used a paper that is too fragile; shorten the fringe on the next attempt.
Fringed pom-poms are excellent for festive gift bags, event backdrops, and large packaging projects. Their size makes them visible from a distance, and they compress almost to nothing when stored flat.
Method 5: The Spiral-Cut Rose
The spiral-cut rose is the closest a piece of wrapping paper can get to a real flower without complex folding. The technique is simple in concept but produces surprisingly convincing petals because the continuous strip forms a natural spiral.
Step-by-step instructions
- Cut a square of wrapping paper, about 20 by 20 centimeters, or one quarter of a standard 57 by 57 centimeter sheet.
- Lightly draw a spiral on the back of the paper. Begin at a point near the edge, wind toward the center in a smooth curve, and leave a disc of 2.5 to 3 centimeters in the middle.
- Cut along the spiral line with scissors. Try to keep the width of the strip at about 1.5 to 2 centimeters. A wavy spiral line will produce wavy petal edges later.
- Start rolling from the outer end of the strip. Turn the strip so the outer edge will face upward, then roll the first two turns tightly around a pencil to form the center of the rose.
- Remove the pencil and continue rolling the strip around the existing center, but roll more loosely and at a slight downward angle so each new layer sits a little lower than the previous one.
- When you reach the central disc, spread a thin layer of glue on its underside and press it against the base of the rose. Hold it for a few seconds until the glue sets.
- Gently open the outer petals with your thumb, curling the top edges outward. Pinch the bottom of the rose together if any petals start to unroll.
The looseness of the roll determines the final character. A tight roll creates a small, neat bud; a loose roll creates a lush, open bloom. If you want a more dramatic shape, use a wavy spiral or pull the outer petal edges over the rim of a pencil before rolling.
Kraft paper is a particularly good partner for this rose. If you want a rustic, vintage look, try a sheet with an old print. A retro newspaper style kraft wrapping paper gives the finished rose a vintage, editorial feel that needs no additional decoration.
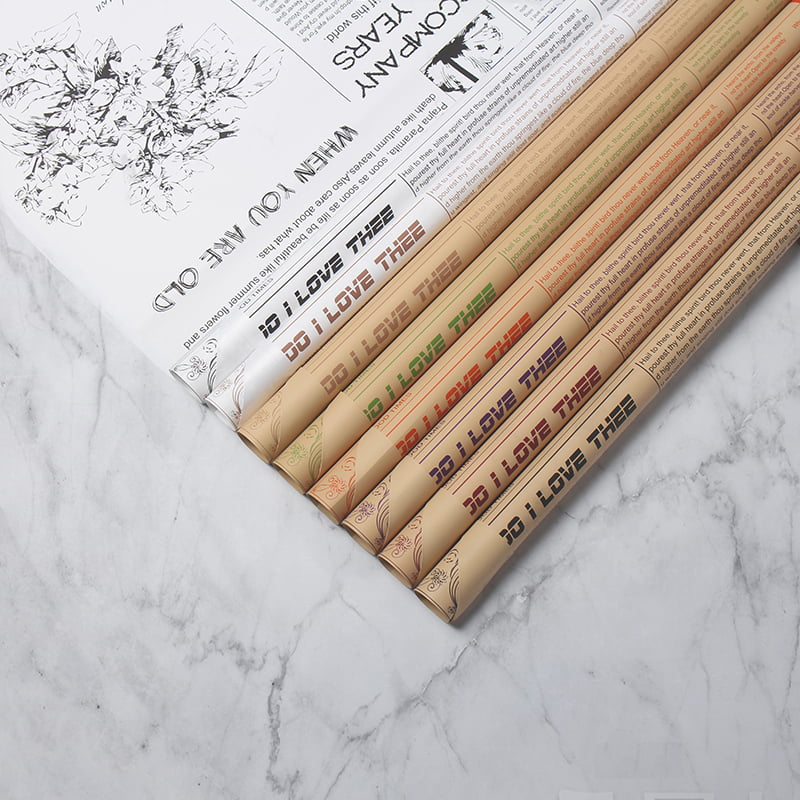 Wholesale MYHC-21 Retro Newspaper Style Cowhide Flowers Wrapping Paper Factory, Jiangxi Lixuan new material Technology Co., Ltd is China wholesale MYHC-21 Retro Newspaper Style Cowhide Flowers Wrapping Paper suppliers...View Product →
Spiral roses are the best technique for corsages and boutonnieres because their compact base can be wired directly to a stem. They also make convincing toppers for wedding invitations and table settings.
Using Paper Flowers on Gifts, Bouquets, and Shop Displays
A paper flower changes the way a wrapped object is received. On a gift, it replaces a generic bow with a custom decorative element that was made for that exact parcel. On a bouquet, it becomes part of the overall floral composition rather than just a functional tie.
Gift toppers
To attach a paper flower to a wrapped box, place it at the intersection of the ribbon straps. If the flower has a wire base, wrap the wire around the ribbon and twist it on the underside of the box. If it does not, use double-sided foam tape or a dot of hot glue under the center disc. For cards and small gifts, use a smaller flower and secure it with a glued center rather than wire.
Bouquet accents
For a wrapped bouquet, position the paper flower at the front, between the stems and the outer wrap, and tie the ribbon over it. The flower should sit where the eye naturally lands when a customer looks at the bouquet straight on. This is a standard professional shortcut: many flower shops pre-make a set of paper flowers matching the paper colors they expect to use that week, then attach them on demand. If you want a celebration-level finish, a gold edged matte flower wrapping paper can be folded with the same methods, and the metallic edging catches the light without competing with the fresh flowers.
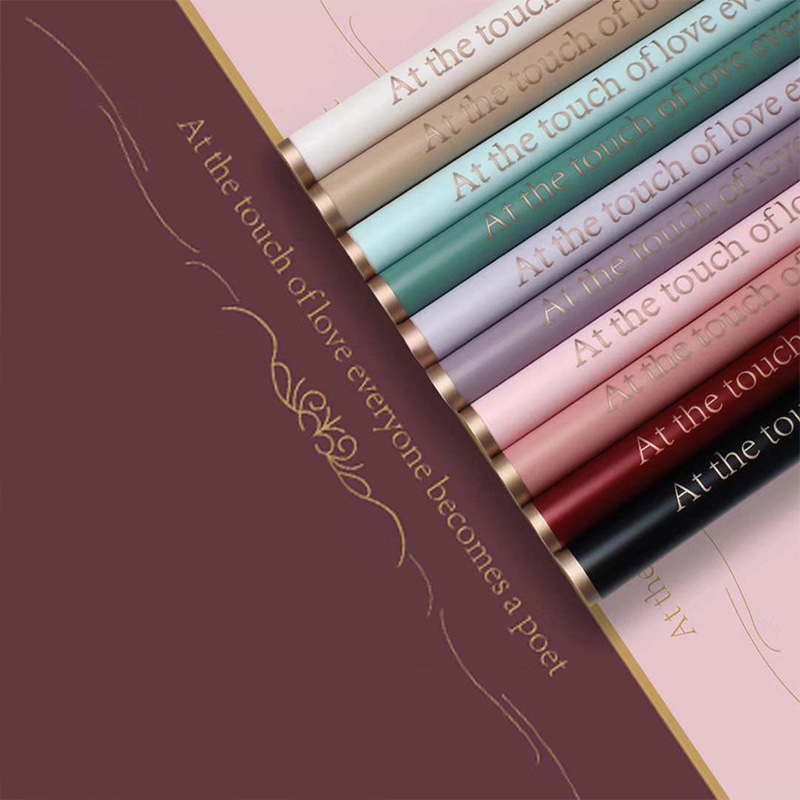 Wholesale 9-color gold-edged matte flower wrapping paper Factory, Suppliers - JiJiangxi Lixuan new material Technology Co., Ltd is China wholesale 9-color gold-edged matte flower wrapping paper suppliers and factory,F...View Product →
Retail displays and events
Paper flowers are also a favorite material for window displays, shelf styling, and event decor. They do not need water, they survive transport, and they can be reused for multiple events when stored correctly. Large pom-poms fill empty corners; spiral roses line a table runner; layered petals can be pinned to a display board. Because they are made from wrapping paper, they can be replaced quickly when the seasonal color palette changes.
For the full set of professional wrapping techniques that surround the bouquet, our guide on how to wrap flowers like a pro shows how the paper, the flower, and the finishing touches are designed to work together.
How Many Flowers Can You Get from One Sheet?
One question comes up often, especially in a shop environment: how much paper does a flower actually consume? The answer depends on the method and the size you choose. The table below gives approximate quantities for a standard 57 by 57 centimeter sheet.
| Flower type | Suggested piece size | Yield per sheet |
|---|---|---|
| Accordion rosette | 8-10 cm wide strips | 2 full rosettes |
| Layered petal flower | 4 petals per layer, 3 layers | 3-4 flowers |
| Folded fan blossom | 6 petals, 8-10 cm circles | 3-4 flowers |
| Fringed pom-pom | 4-6 stacked sheets, 20-25 cm | 1 pom-pom per stack |
| Spiral rose | 20 x 20 cm squares | 4 roses |
These numbers are starting points, not rules. If you fold tighter pleats, you can fit more petals in the same strip. If you use a larger circle for a fan blossom, the yield drops. For businesses that buy wrapping paper by the carton, the practical takeaway is encouraging: a single carton of standard sheets can supply hundreds of paper flower accents without cutting into the paper budget in any meaningful way.
Common Mistakes and How to Avoid Them
Paper flowers rarely fail for dramatic reasons. Most failures come from small, predictable mistakes. Here are the ones worth checking first.
- Using the wrong paper weight for the method. Very thin paper tears while curling; very thick paper will not pleat cleanly and forces the flower open. Adjust the method to the material instead of pushing a material to do what it cannot.
- Skipping the template. Freehand cutting invites uneven petals. A cardboard template takes five minutes to make and pays off in every later flower.
- Over-gluing. A visible drop of glue on the visible side has ruined many neat flowers. Use a glue stick for broad surfaces, a toothpick to apply small dots, and always apply glue to the side that will be hidden.
- Pressing the finished flower flat while the glue sets. The center should stay elevated; flattening the center gives the flower a squashed look. Hold the flower by the base while drying, or place it with the center upward.
- Skipping the center treatment. The eye lands on the center of a flower. A button, bead, or small paper disc gives the flower a finish that a bare staple or twisted paper tip cannot match.
- Ignoring pattern direction. With a printed or patterned paper, such as newspaper style or striped designs, the petals should share a consistent orientation. Otherwise the pattern clashes with the flower shape.
- Using plastic film as if it were paper. OPP film and cellophane do not hold folds. Use them only for a gloss accent layer, with glue or wire, not for folded petals.
If a flower looks "wrong" but you cannot identify why, compare it to a photo of a similar flower and check the proportions: petal width relative to flower height, the size of the center relative to the outer petals, and the amount of space between layers. Proportion problems are the most common invisible issue in homemade paper flowers.
Caring for Your Paper Flowers
Paper flowers are low maintenance but not no-maintenance. They stay fresh looking longest in a dry room with stable temperature, away from direct sunlight. Sunlight fades pigments over time, especially in kraft and matte papers; radiators and heat sources cause the paper to dry out and curl.
Dust the flowers occasionally with a soft dry brush, or use a hairdryer on a cool setting held at a distance. Do not use water or cleaning sprays. If a flower loses its shape, restore it by gently pulling the layers apart. If a petal has unrolled, re-curl it around a pencil and hold it for a few seconds.
Store finished flowers flat in a box with a sheet of acid-free tissue between layers. Do not stack heavy objects on top. For flowers used on fresh bouquets, remove the paper flower before the customer transfers the flowers to a vase, or make the flower from a waterproof coated paper so that it can survive brief contact with water. A little planning in storage extends the life of the flower to months, which is far longer than any fresh bloom can last.
Scaling Up: Paper Flowers in a Flower Shop or Workshop
Making one paper flower is a craft. Making fifty requires a small system. The good news is that the methods in this guide are mechanical enough to scale without losing their charm.
Build a color and material standard
Decide, once, which wrapping paper families the shop will use for the season. When the paper supply is consistent, the flower colors and textures stay consistent. This is important for a retail brand: customers notice when the accent flower matches the wrap exactly, because that is precisely what store-bought toppers cannot do.
Prepare parts in batches
Batch production avoids repeated set-up. Cut all the strips and circles for rosettes in one session; staple them all at once; glue the centers in a final pass. For layered flowers, keep a set of pre-cut petals for each color family in labeled envelopes. A single afternoon of batch cutting can supply several weeks of flower accents.
Train one documented routine
Write the steps once, with the exact measurements your shop uses. New staff can then produce the same flowers without guesswork. This is especially useful for shops that offer online flower delivery: the same paper flower accent can be reproduced on every order, which strengthens the recognition of the brand.
Reuse scrap paper deliberately
Sort leftover paper by color and material rather than throwing it into one bin. Large offcuts become layered petal flowers; narrow strips become rosettes; irregular pieces become fringed pom-poms or small spiral roses. A simple sorting habit turns waste into a second product line.
Choosing a Color Palette for Your Paper Flowers
The flower will be seen against the wrapping paper it came from, so the palette is already half-decided. The remaining choices are about accent and depth:
- Same color, same sheet: the flower is invisible at first glance and reveals itself as texture; this is the most elegant result.
- Same color family, two tones: a slightly darker or lighter flower adds depth without breaking harmony.
- Complementary accent: a small flower in a contrast color, such as gold or white on a deep green kraft, becomes the main focal point of the parcel.
- Patterned center: if the wrapping paper carries a print, cut the center disc from a matching solid paper to keep the pattern from getting busy.
When working from printed or patterned paper, pay attention to the direction of the pattern on the petal. A newspaper-style print reads as text on a flower; rotate the petals so the text all runs in the same direction for a clean look. For an intentionally playful look, rotate them randomly. Both choices are valid; the mistake is leaving the orientation to chance.
The material in front of you has more patience than a fresh flower. It will not wilt, it will not scatter pollen, and it will hold its shape as long as the place you put it is dry and clean. With the accordion rosette as a starting point, the layered petal flower as a lesson in proportion, the folded fan blossom as a study in repetition, the fringed pom-pom as an exercise in fluff, and the spiral-cut rose as the closest match to a real bloom, you have a complete toolkit for turning wrapping paper into flowers.
The best flower is the one that matches the paper, the occasion, and the maker's patience. Try one method today with leftover paper. The finished flower will look like a considered detail, because it is one.
 +86-18270363850
